Bootstrap 4 มีคลาสให้เราเลือกใช้สำหรับการสร้างตารางสวย ๆ หลายรูปแบบด้วยกัน
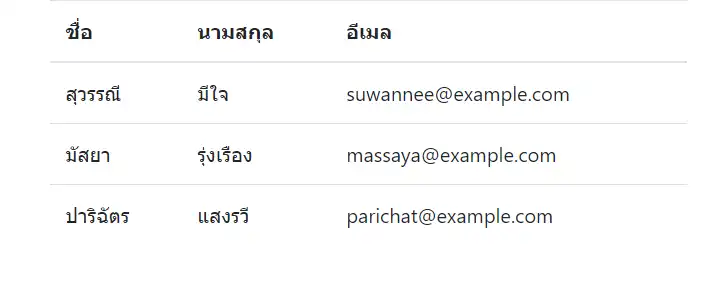
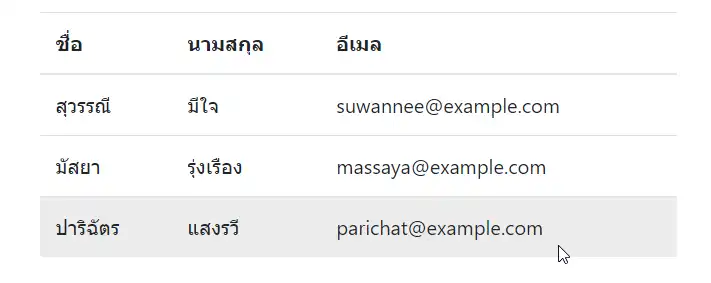
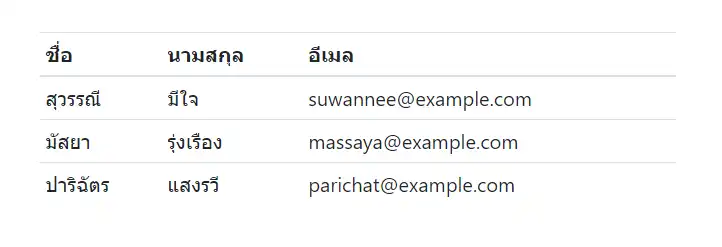
Basic Table ตารางขั้นพื้นฐาน
ถ้าต้องการสร้างตารางแบบเบสิค สามารถใช้คลาส .table ในการสร้างตารางได้เลย
  <div class="container">
    <table class="table">
      <thead>
        <tr>
          <th>ชื่อ</th>
          <th>นามสกุล</th>
          <th>อีเมล</th>
        </tr>
      </thead>
      <tbody>
        <tr>
          <td>สุวรรณี</td>
          <td>มีใจ</td>
          <td>[email protected]</td>
        </tr>
        <tr>
          <td>มัสยา</td>
          <td>รุ่งเรือง</td>
          <td>[email protected]</td>
        </tr>
        <tr>
          <td>ปาริฉัตร</td>
          <td>แสงรวี</td>
          <td>[email protected]</td>
        </tr>
      </tbody>
    </table>
</div>- บรรทัดที่ 2 กำหนดคลาส
.tableให้กับเอลิเมนต์<table>
ตารางที่ได้จะเป็นตารางที่มีเส้นกั้นในแนวนอน
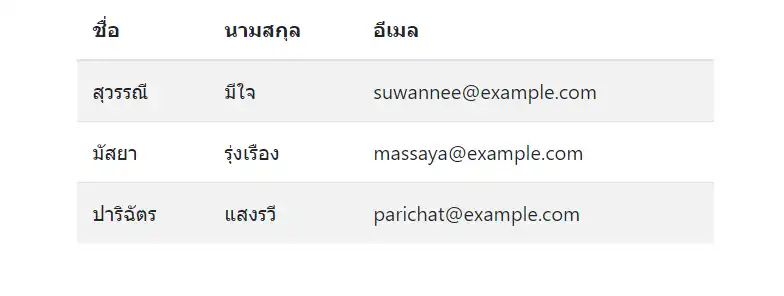
Striped Rows ตารางที่แถวคี่กับแถวคู่มีสีต่างกัน
คลาส .table-striped จะทำให้เราได้ตารางที่แถวเลขคี่กับแถวเลขคู่มีสีไม่เหมือนกัน สีของแถวในตารางจะคล้าย ๆ ม้าลาย (zebra-stripes)
  <div class="container">
    <table class="table table-striped">
      <thead>
        <tr>
          <th>ชื่อ</th>
          <th>นามสกุล</th>
          <th>อีเมล</th>
        </tr>
      </thead>
      <tbody>
        <tr>
          <td>สุวรรณี</td>
          <td>มีใจ</td>
          <td>[email protected]</td>
        </tr>
        <tr>
          <td>มัสยา</td>
          <td>รุ่งเรือง</td>
          <td>[email protected]</td>
        </tr>
        <tr>
          <td>ปาริฉัตร</td>
          <td>แสงรวี</td>
          <td>[email protected]</td>
        </tr>
      </tbody>
    </table>
</div>- บรรทัดที่ 2 เพิ่มคลาส
tableและtable-stripedให้เอลิเมนต์<table>
ตารางที่ได้ แถวเลขคี่แกับแถวเลขคู่จะมีสีพื้นหลังไม่เหมือนกัน
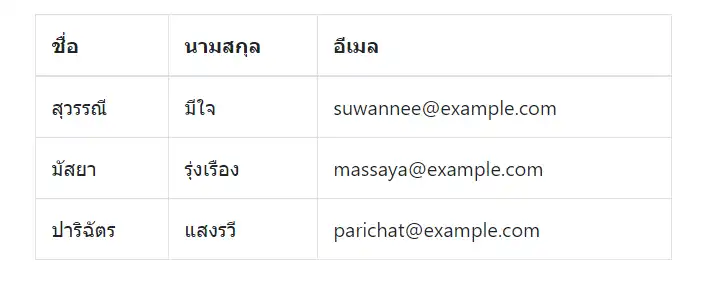
Bordered Table ตารางที่มีเส้นขอบ
คลาส .table-bordered จะทำให้เราได้ตารางที่มีเส้นขอบทุกด้าน
  <div class="container">
    <table class="table table-bordered">
      <thead>
        <tr>
          <th>ชื่อ</th>
          <th>นามสกุล</th>
          <th>อีเมล</th>
        </tr>
      </thead>
      <tbody>
        <tr>
          <td>สุวรรณี</td>
          <td>มีใจ</td>
          <td>[email protected]</td>
        </tr>
        <tr>
          <td>มัสยา</td>
          <td>รุ่งเรือง</td>
          <td>[email protected]</td>
        </tr>
        <tr>
          <td>ปาริฉัตร</td>
          <td>แสงรวี</td>
          <td>[email protected]</td>
        </tr>
      </tbody>
    </table>
</div>- บรรทัดที่ 2 เพิ่มคลาส
tableและtable-borderedให้เอลิเมนต์<table>
ตารางที่ได้จะมีเส้นขอบทุกด้าน
Hover Rows ทำให้แถวที่เมาส์ชี้มีสีเปลี่ยนไป
ถ้าต้องการให้สีพื้นหลังของแถวในตารางที่เมาส์ชี้อยู่มีสีเปลี่ยนไป ให้ใช้คลาส .table-hover
  <div class="container">
    <table class="table table-hover">
      <thead>
        <tr>
          <th>ชื่อ</th>
          <th>นามสกุล</th>
          <th>อีเมล</th>
        </tr>
      </thead>
      <tbody>
        <tr>
          <td>สุวรรณี</td>
          <td>มีใจ</td>
          <td>[email protected]</td>
        </tr>
        <tr>
          <td>มัสยา</td>
          <td>รุ่งเรือง</td>
          <td>[email protected]</td>
        </tr>
        <tr>
          <td>ปาริฉัตร</td>
          <td>แสงรวี</td>
          <td>[email protected]</td>
        </tr>
      </tbody>
    </table>
</div>- บรรทัดที่ 2 เพิ่มคลาส
tableและtable-hoverให้เอลิเมนต์<table>
เมื่อนำเมาส์ไปชี้ที่แถวใด ๆ ในตาราง สีพื้นหลังของแถวนั้นจะเปลี่ยนเป็นสีเทา
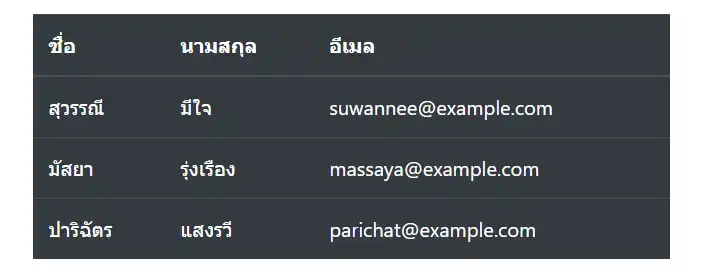
ตารางที่มีพื้นหลังสีดำ
ถ้าต้องการให้ตารางมีพื้นหลังสีดำ ให้ใช้คลาส .table-dark
  <div class="container">
    <table class="table table-dark">
      <thead>
        <tr>
          <th>ชื่อ</th>
          <th>นามสกุล</th>
          <th>อีเมล</th>
        </tr>
      </thead>
      <tbody>
        <tr>
          <td>สุวรรณี</td>
          <td>มีใจ</td>
          <td>[email protected]</td>
        </tr>
        <tr>
          <td>มัสยา</td>
          <td>รุ่งเรือง</td>
          <td>[email protected]</td>
        </tr>
        <tr>
          <td>ปาริฉัตร</td>
          <td>แสงรวี</td>
          <td>[email protected]</td>
        </tr>
      </tbody>
    </table>
</div>- บรรทัดที่ 2 เพิ่มคลาส
tableและtable-darkให้เอลิเมนต์<table>
ตารางที่ได้จะมีพื้นหลังมืด
ตารางแบบหลายสไตล์รวมกัน
เราสามารถใช้คลาสต่าง ๆ ดังที่กล่าวมารวมกัน เพื่อให้ได้ผลลัพธ์เป็นตารางที่มีสไตล์หลาย ๆ สไตล์รวมกัน เช่น
เมื่อต้องการตารางพื้นหลังมืดและมีสีพื้นหลังของแถวคี่และคู่ไม่เหมือนกัน ก็ใช้คลาส table-dark และ table-striped ร่วมกัน ดังนี้
  <div class="container">
    <table class="table table-dark table-striped">
      <thead>
        <tr>
          <th>ชื่อ</th>
          <th>นามสกุล</th>
          <th>อีเมล</th>
        </tr>
      </thead>
      <tbody>
        <tr>
          <td>สุวรรณี</td>
          <td>มีใจ</td>
          <td>[email protected]</td>
        </tr>
        <tr>
          <td>มัสยา</td>
          <td>รุ่งเรือง</td>
          <td>[email protected]</td>
        </tr>
        <tr>
          <td>ปาริฉัตร</td>
          <td>แสงรวี</td>
          <td>[email protected]</td>
        </tr>
      </tbody>
    </table>
  </div>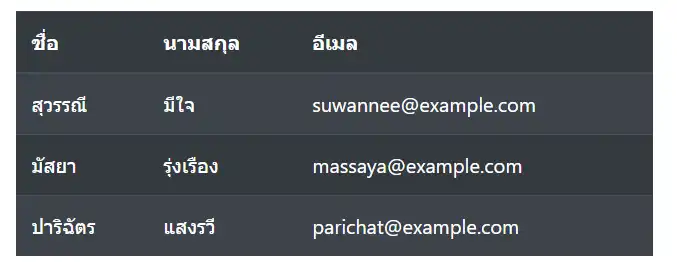
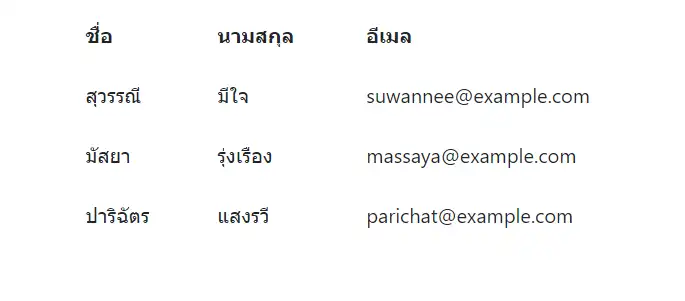
Borderless Table ตารางที่ไม่มีเส้นขอบ
ถ้าต้องการตารางที่ไม่มีเส้นขอบ ให้ใช้คลาส .table-borderless
 <div class="container">
    <table class="table table-borderless">
      <thead>
        <tr>
          <th>ชื่อ</th>
          <th>นามสกุล</th>
          <th>อีเมล</th>
        </tr>
      </thead>
      <tbody>
        <tr>
          <td>สุวรรณี</td>
          <td>มีใจ</td>
          <td>[email protected]</td>
        </tr>
        <tr>
          <td>มัสยา</td>
          <td>รุ่งเรือง</td>
          <td>[email protected]</td>
        </tr>
        <tr>
          <td>ปาริฉัตร</td>
          <td>แสงรวี</td>
          <td>[email protected]</td>
        </tr>
      </tbody>
    </table>
</div>- บรรทัดที่ 2 เพิ่มคลาส
tableและtable-borderlessให้เอลิเมนต์<table>
ตารางที่ได้จะไม่มีเส้นขอบ
Contextual Classes
เราสามารถใช้ Contextual Classes กำหนดสีพื้นหลังให้กับตารางทั้งตาราง แถวทั้งแถว หรือแต่ละคอลัมน์ได้ ซึ่งคลาสที่ใช้ได้มีดังนี้ .table-primary, .table-success, .table-info, .table-warning, .table-danger, .table-active, .table-secondary, .table-light และ .table-dark
  <div class="container">
    <table class="table">
      <thead>
        <tr>
          <th>ชื่อคลาส</th>
        </tr>
      </thead>
      <tbody>
        <tr class="table-primary">
          <td>table-primary</td>
        </tr>
        <tr class="table-success">
          <td>table-success</td>
        </tr>
        <tr class="table-danger">
          <td>table-danger</td>
        </tr>
        <tr class="table-info">
          <td>table-info</td>
        </tr>
        <tr class="table-warning">
          <td>table-warning</td>
        </tr>
        <tr class="table-active">
          <td>table-active</td>
        </tr>
        <tr class="table-secondary">
          <td>table-secondary</td>
        </tr>
        <tr class="table-light">
          <td>table-light</td>
        </tr>
        <tr class="table-dark text-dark">
          <td>table-dark</td>
        </tr>
      </tbody>
    </table>
  </div>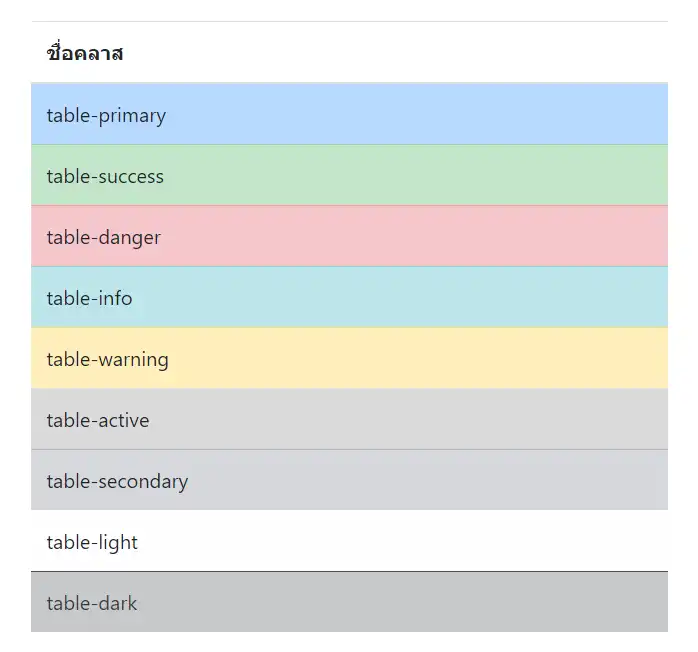
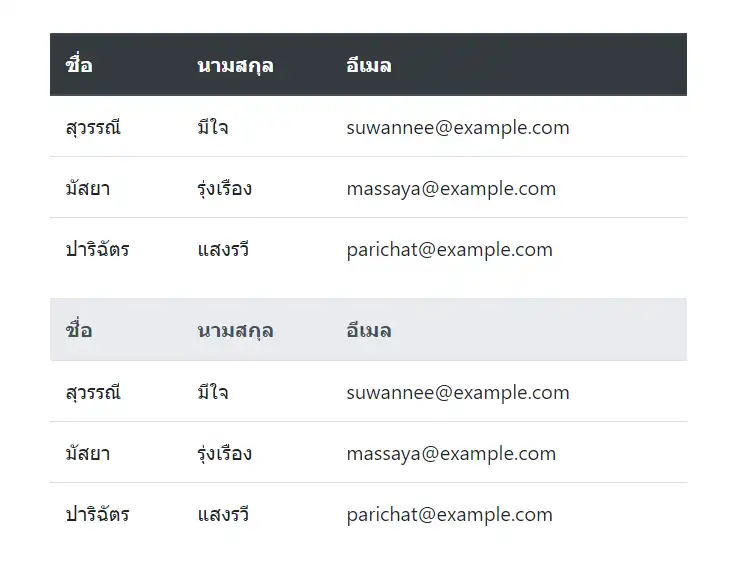
กำหนดสีพื้นให้หัวตาราง
เราสามารถใช้คลาส .thead-dark เพื่อกำหนดสีดำให้เป็นสีพื้นหลังของหัวตาราง และใช้คลาส .thead-light เพื่อกำหนดสีเทาให้เป็นสีพื้นหลังของหัวตาราง โดยกำหนดคลาสไว้ในเอลิเมนต์ <thead>
  <div class="container">
    <table class="table">
      <thead class="thead-dark">
        <tr>
          <th>ชื่อ</th>
          <th>นามสกุล</th>
          <th>อีเมล</th>
        </tr>
      </thead>
      <tbody>
        <tr>
          <td>สุวรรณี</td>
          <td>มีใจ</td>
          <td>[email protected]</td>
        </tr>
        <tr>
          <td>มัสยา</td>
          <td>รุ่งเรือง</td>
          <td>[email protected]</td>
        </tr>
        <tr>
          <td>ปาริฉัตร</td>
          <td>แสงรวี</td>
          <td>[email protected]</td>
        </tr>
      </tbody>
    </table>
    <table class="table">
      <thead class="thead-light">
        <tr>
          <th>ชื่อ</th>
          <th>นามสกุล</th>
          <th>อีเมล</th>
        </tr>
      </thead>
      <tbody>
        <tr>
          <td>สุวรรณี</td>
          <td>มีใจ</td>
          <td>[email protected]</td>
        </tr>
        <tr>
          <td>มัสยา</td>
          <td>รุ่งเรือง</td>
          <td>[email protected]</td>
        </tr>
        <tr>
          <td>ปาริฉัตร</td>
          <td>แสงรวี</td>
          <td>[email protected]</td>
        </tr>
      </tbody>
    </table>
</div>- บรรทัดที่ 3 กำหนดคลาส
table-darkไว้ในเอลิเมนต์<thead> - บรรทัดที่ 29 กำหนดคลาส
table-lightไว้ในเอลิเมนต์<thead>
จะได้ตารางที่แถวหัวตารางมีสีพื้นหลังตามที่กำหนด
Small table ตารางขนาดเล็ก
ถ้าต้องการตารางขนาดเล็กกว่าปกติ ให้ใช้คลาส table-sm ซึ่งจะทำให้ได้ตารางขนาดเล็กกว่าปกติ โดยจะตัดระยะห่างระหว่างเซลล์ลงครึ่งหนึ่ง
  <div class="container">
    <table class="table table-sm">
      <thead>
        <tr>
          <th>ชื่อ</th>
          <th>นามสกุล</th>
          <th>อีเมล</th>
        </tr>
      </thead>
      <tbody>
        <tr>
          <td>สุวรรณี</td>
          <td>มีใจ</td>
          <td>[email protected]</td>
        </tr>
        <tr>
          <td>มัสยา</td>
          <td>รุ่งเรือง</td>
          <td>[email protected]</td>
        </tr>
        <tr>
          <td>ปาริฉัตร</td>
          <td>แสงรวี</td>
          <td>[email protected]</td>
        </tr>
      </tbody>
    </table>
</div>- บรรทัดที่ 2 กำหนดคลาส
tableและtable-smให้กับเอลิเมนต์<table>
ตารางที่ได้จะมีขนาดเล็กกว่าปกติ เพราะถูกตัดระยะห่างระหว่างเซลล์ไปครึ่งหนึ่ง
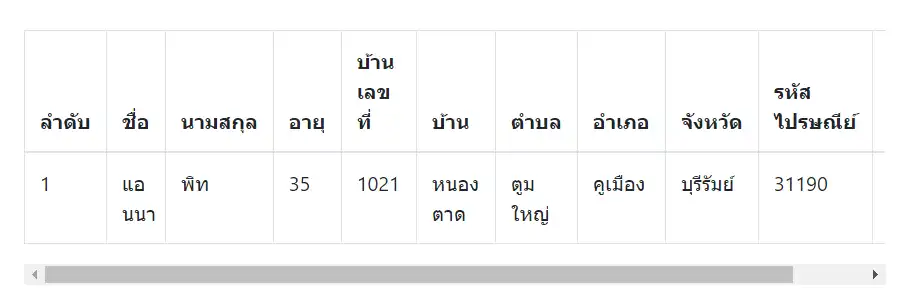
Responsive Tables ตารางที่เหมาะต่อการแสดงผลบนทุกอุปกรณ์
ถ้าต้องการทำตารางแบบ Responsive ที่เหมาะแก่การแสดงผลบนทุกอุปกรณ์ ให้ใช้คลาส .table-responsive ซึ่งจะทำให้มีสกรอลบาร์แนวนอนปรากฏขึ้นมาเมื่อแสดงผลบนอุปกรณ์ที่มีความกว้างน้อยกว่า 992px โดยให้แทรกคลาสดังกล่าวไว้ในเอลิเมนต์ <div> ซึ่งครอบเอลิเมนต์ <table> อีกที
  <div class="container">
    <div class="table-responsive">
      <table class="table table-bordered">
        <thead>
          <tr>
            <th>ลำดับ</th>
            <th>ชื่อ</th>
            <th>นามสกุล</th>
            <th>อายุ</th>
            <th>บ้านเลขที่</th>
            <th>บ้าน</th>
            <th>ตำบล</th>
            <th>อำเภอ</th>
            <th>จังหวัด</th>
            <th>รหัสไปรษณีย์</th>
            <th>เบอร์โทร</th>
          </tr>
        </thead>
        <tbody>
          <tr>
            <td>1</td>
            <td>แอนนา</td>
            <td>พิท</td>
            <td>35</td>
            <td>1021</td>
            <td>หนองตาด</td>
            <td>ตูมใหญ่</td>
            <td>คูเมือง</td>
            <td>บุรีรัมย์</td>
            <td>31190</td>
            <td>044-567890</td>
          </tr>
        </tbody>
      </table>
    </div>
</div>- บรรทัดที่ 2 แทรกคลาส
table-responsiveให้เอลิเมนต์<div>ที่อยู่รอบนอกครอบเอลิเมนต์<table>อยู่
เมื่อแสดงผลบนหน้าจอที่มีความกว้างมากกว่าหรือเท่ากับ 992px ตารางจะแสดงผลตามปกติ

แต่เมื่อแสดงผลบนอุปกรณ์ที่มีความกว้างของหน้าจอน้อยกว่า 992px ด้านล่างของตารางจะมีสกรอลบาร์ปรากฏขึ้นมาเพื่อให้เลื่อนดูข้อมูลในตารางได้
อย่างไรก็ตาม เราสามารถกำหนดได้ว่า จะให้ตารางแสดงสกรอลบาร์เมื่อแสดงผลบนหน้าจอขาดเท่าใด โดยใช้คลาสเหล่านี้
| คลาส | ขนาดหน้าจอ |
.table-responsive-sm | < 576px |
.table-responsive-md | < 768px |
.table-responsive-lg | < 992px |
.table-responsive-xl | < 1200px |